Showing posts with label Minwax Wood Finish Stain Marker. Show all posts

Sunday, March 24, 2013

Vintage Rolling Pins Display

This is another idea I got from my favorite blog, The Inspired Room, click HERE to see the post. 
Here is my inspiration pic...
First, I got the beadboard from my local Ace Hardware and cut it to 2'x2.5'. I also cut a 2'x2.5' 
piece of plywood for strength and used Liquid Nails to secure the 2 boards together. 
Next, my grandpa and I cut the pegs on the band saw and put the holes in the board.  
I painted the pegs and used Liquid Nails to secure them into their holes. 
Then, I did some sanding on the edges of the board and the pegs, stained the sanded parts with my handy-dandy Stain Marker, and went over both the board and pegs with a thin coat of glaze.
Last, I screwed 4 large screws through the board and into the wall on the 4 corners to hang it. 
Rolling Pin Collection: I started out with the one with red handles and the one with 
light teal handles. I believe they were both my great-grandmother's. My grandmother 
gave me the marble one (very heavy) which I love. I bought the hand-carved one on the 
top and the big one on the very bottom (which I was told is very old). 
I am now a lover of old rolling pins and my collection has grown to 11...

My Materials List:
5 vintage/antique rolling pins
beadboard 2x2.5'
plywood 2x2.5'
pegs - Hobby Lobby or online 
paint - Antique White Benjamin Moore
Minwax Wood Finish Stain Marker (I used Provincial)
Glaze - Ace Artistic Finishes 10 shots Raw Umber
Drill, 4 long screws, screwdriver
;) Mimi

Tuesday, February 19, 2013

Ornate Switch Plate Makeover

My sister's new house had these gold, ornate light switch plates and outlet covers throughout the entire house. I'm guessing they are from '69 since thats when the house was built and nothing else was updated...
Here's a pic of the process in steps...
1. Original look
2. Painted
3. Paint wiped off 
4. Stained 

First, I painted them an Antique White color and then wiped it off with 
damp paper towel where I wanted the brass to show
Next, I used the stain marker across the entire thing to get the stain into the crevices.
Finally, I wiped off most of the stain and...Finished Product :)
;) Mimi

Sunday, February 10, 2013

Vintage Mirror

I found this vintage mirror at a consignment shop in Abilene, Tx. I've had it for months just thinking about what I wanted to do with it and where to put it. 
I was "color inspired" by a chair that was my great-grandmother's (1940s) and my grandmother recovered in 1968. I wanted a true vintage chartreuse and I chose Benjamin Moore Meadow View.
 
I primed the mirror with Zinssers (so I didn't have to sand it), then painted. I sanded it by hand just a bit on the edges to give it a bit of distress. I also used a Minwax Wood Finish Stain Marker (Golden Oak) in the crevases. Finally, I sprayed on a coat of poly. 
Color: Benjamin Moore Meadow View
Stained: in crevases with Minwax Wood Finish Stain Marker 
(in Golden Oak)
Coat of Spray on Poly
;) Mimi

Friday, February 8, 2013

Headboard Re-Do

Before:
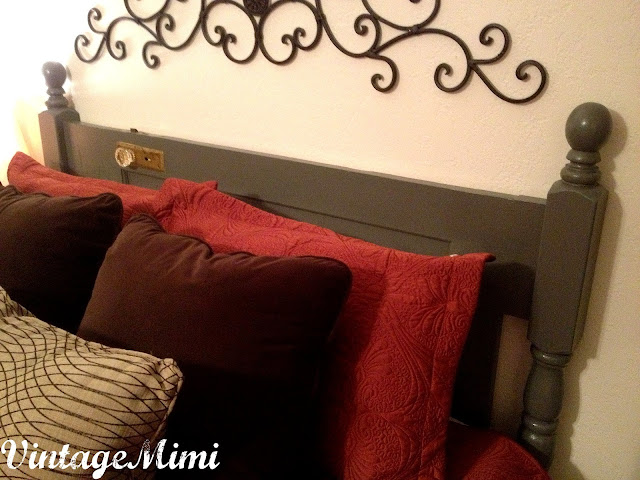
A neighbor made this headboard for me years ago out of an old door and fence posts. The color was way too close to the wall color in my bedroom; so I have been planning to paint it for a while.
I decided on Benjamin Moore Kendall Charcoal to give it a rich gray color that would compliment my bedding and the wall color. After 2 coats of paint I went back in the cracks and crevases with my handy-dandy Minwax Wood Finish Stain Marker (in Golden Oak).
Then, I tried something new (sort of)... I used the spray on version of the Minwax Poly I always use... It was so quick and easy and I will definitely be using it again...Especially on large pieces or things like chairs that are annoying to do. 
Color: Benjamin Moore Kendall Charcoal
Glaze/Stain: Minwax Wood Finish Stain Marker in Golden Oak
2 coats of Spray-On Minwax Poly
;) Mimi
Blogging tips